
Troubleshooting Nest Thermostat Wiring Issues: Common Problems and Solutions
The Nest Thermostat is a fantastic addition to any home, providing advanced features for energy efficiency and ease of control. However, when it comes to installation and operation, one of the most common challenges homeowners face is wiring issues. If your Nest Thermostat is not functioning as expected, the problem may lie in the wiring. This article will explore the most common wiring issues with Nest Thermostats, provide solutions to fix them, and discuss the benefits of resolving these problems for improved performance.
Understanding the Basics of Nest Thermostat Wiring
Before diving into common issues, it’s important to understand how the Nest Thermostat connects to your HVAC system.
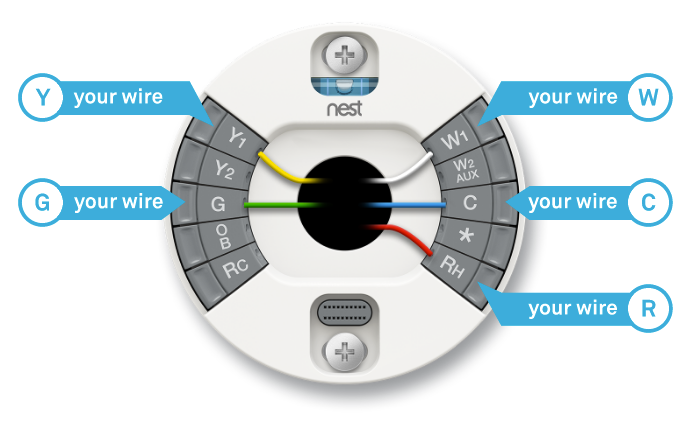
Typically, a Nest Thermostat requires several wires to connect to your HVAC system. These wires correspond to different functions, such as heating, cooling, and powering the thermostat. Here’s an overview of the standard wires:
- Red wire (R or Rh): Provides power to the thermostat.
- Green wire (G): Controls the fan.
- Yellow wire (Y): Controls the cooling system (air conditioner).
- White wire (W): Controls the heating system (furnace).
- C-wire (Common): Provides continuous power to the thermostat.
- Blue wire (C): Also used as the common wire in some systems.
Common Nest Thermostat Wiring Issues
There are several common wiring issues that can occur during the installation or use of the Nest Thermostat. Let’s take a closer look at each one and how to troubleshoot them.
1. No C-Wire (Common Wire) Connection
One of the most frequent wiring issues users encounter is the lack of a C-wire, which provides continuous power to the Nest Thermostat. Without it, the thermostat may not function properly or could drain the battery too quickly.
Solution:
- If your system doesn’t have a C-wire, you can either connect a C-wire to the existing wiring or use a C-wire adapter.
- Alternatively, a Nest Power Connector can be used to replace the C-wire, providing the necessary power for the thermostat.
2. Incorrectly Wired Wires
During installation, it’s possible that wires may be placed in the wrong terminals, which can cause the Nest Thermostat to malfunction. For example, the Y-wire (for cooling) may be connected to the W terminal (for heating), or the R wire may be improperly connected to the wrong power terminal.
Solution:
- Double-check the wiring using the Nest app or the device’s settings menu to ensure that each wire is connected to the correct terminal.
- If necessary, consult your HVAC system’s manual or hire a professional to verify and correct the wiring.
3. Loose or Damaged Wires
Loose or damaged wires can cause the thermostat to lose power or fail to communicate properly with the HVAC system. Over time, wires can become loose due to vibrations or wear and tear, leading to faulty connections.
Solution:
- Check each wire for tight connections and ensure they are securely inserted into their corresponding terminals.
- Inspect wires for any visible damage, such as frays or burns, and replace them if needed. If the damage is internal, you may need to call a professional to repair or replace the damaged wire.
4. Short Circuits
A short circuit can occur when wires accidentally touch each other or come into contact with metal surfaces. This can cause a malfunction in the thermostat or even damage the HVAC system.
Solution:
- Inspect the wiring for any areas where wires might be touching or where the insulation is worn off. If you find a short circuit, disconnect the thermostat immediately and inspect the wires for potential damage.
- It’s advisable to have a professional technician assess and fix the short circuit to prevent any further damage.
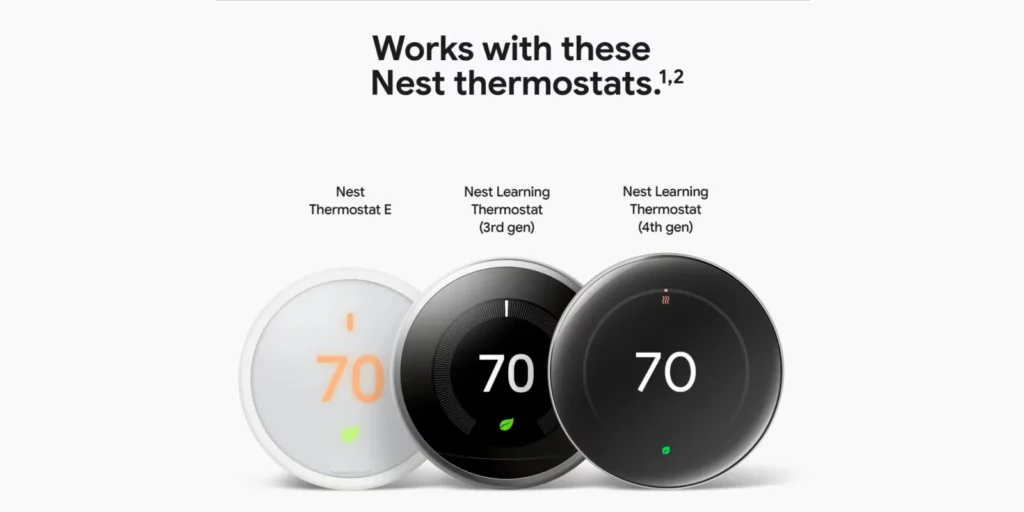
5. Incompatible HVAC Systems
Some older HVAC systems may not be fully compatible with the Nest Thermostat, causing issues with wiring or performance. Systems that do not support certain wires or require specific wiring configurations may result in malfunctioning thermostats.
Solution:
- Ensure your HVAC system is compatible with the Nest Thermostat before installation. Nest offers a compatibility checker on its website to help you determine if your system will work with the device.
- If your HVAC system is incompatible, consider upgrading to a more modern system or consulting a professional installer for alternative solutions.
Benefits of Proper Nest Thermostat Wiring
Properly wired Nest Thermostats are essential for optimal performance and long-term savings. Here are some benefits of ensuring your Nest Thermostat wiring is correct:
1. Energy Efficiency
This ensures that the HVAC systems are running efficiently, reducing energy consumption and lowering your utility bills.
2. Longevity of the Thermostat and HVAC System
Correct wiring prevents damage to the thermostat and HVAC system, ensuring both devices last longer. Proper wiring also avoids issues like overheating or power surges, which can reduce the lifespan of your system.
3. Improved Comfort
This leads to greater comfort, as the thermostat will be able to respond more quickly and accurately to changes in your home’s temperature.
Real-World Examples of Nest Thermostat Wiring Solutions
Here are a few examples of how addressing Nest Thermostat wiring issues has helped homeowners improve their home’s energy efficiency and comfort:
- Example 1: Adding a C-Wire for Power
A homeowner with an older HVAC system without a C-wire installed a Nest Thermostat but noticed that the thermostat’s battery drained quickly. After installing a C-wire using a Nest Power Connector, the thermostat started functioning correctly without battery issues.
- Example 2: Fixing Incorrect Wiring on a Multi-Zone System
A homeowner with a multi-zone HVAC system had trouble getting their Nest Thermostat to control the heating and cooling systems independently. After consulting a professional, they discovered that the wires were incorrectly connected.
- Example 3: Replacing Damaged Wires
A homeowner noticed their Nest Thermostat was not responding correctly to temperature changes. Upon inspection, they discovered that a wire had become frayed and was not making proper contact. After replacing the damaged wire, the thermostat worked flawlessly again.
How to Buy a Nest Thermostat
You can easily purchase the Nest Thermostat from several online and offline retailers. Here’s where to look:
- Amazon: Amazon often offers competitive prices on Nest Thermostats, with customer reviews to help guide your decision.
- Google Store: Purchase directly from the Google Store for the latest models and possible discounts.
- Best Buy: Best Buy provides Nest Thermostats along with professional installation services, ensuring a seamless setup.
Click here to buy the Nest Thermostat from Best Buy
FAQ
- How do I fix a Nest Thermostat with no power? If your Nest Thermostat has no power, check for a C-wire connection or consider using a Nest Power Connector.
- What if my Nest Thermostat is not connecting Check the wiring and ensure the thermostat is receiving enough power. Also, try resetting your Wi-Fi connection and reconnecting the thermostat.
- Can I install the Nest Thermostat Many homeowners can install the Nest Thermostat themselves with the help of the app, but if you’re unsure about the wiring or encounter issues, it’s recommended to hire a professional installer to avoid damage to your system.
Whether you’re dealing with a missing C-wire, incorrect connections, or damaged wiring, understanding how to resolve these problems can help you optimize your thermostat for better energy efficiency and performance.